🍫 Southern Chocolate Cobbler – Indulgence Made Easy
Imagine ordering the most indulgent lava cake at a fancy restaurant—but you get it at home, made easily, from pantry staples, and loved by everyone. That’s exactly what this Southern Chocolate Cobbler delivers. No complicated steps. No fancy ingredients. Just magic in the oven.
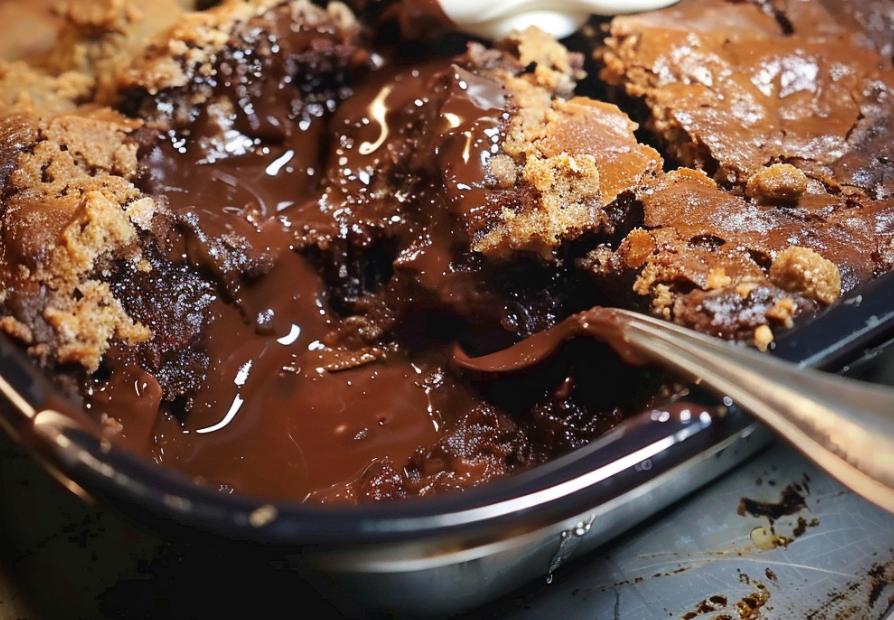
With a simple batter, a cocoa‑sugar topping, boiling water poured on top, and a bake that does all the work—what emerges is a rich, fudgy molten chocolate sauce beneath a brownie‑ish cake layer. It’s familiar comfort, elevated. Whether you’re feeding family, friends, or just treating yourself, this dessert hits the spot.
In this article you’ll find everything you need: full ingredient list, step‑by‑step method, chef‑style tips (channeling the likes of Chef Ina Garten, Chef Bobby Flay & Chef Gordon Ramsay), health & safety considerations, a detailed nutrition & health benefits table, internal links to further reading, and 10 FAQs to answer your burning questions. Let’s dive in.
Introduction
Hi there—your cooking guide (“Chef Cooking” for this journey) here. Today we’re tackling a dessert that’s deeply rooted in Southern comfort cooking: the Southern Chocolate Cobbler. Many cobblers are fruit‑based, but this chocolate version flips the script: a layer of light chocolate cake on top with rich molten chocolate beneath. One recipe describes it as “part brownie, part lava cake, and 100% Southern comfort.” :contentReference[oaicite:1]{index=1}
The process is beautifully simple: melt butter in your baking dish while the oven preheats, pour a batter of sugar/flour/cocoa/milk/vanilla over the melted butter, sprinkle the topping sugar‑cocoa mix, then pour boiling water carefully over everything (without stirring!). Bake until the top is set but the bottom still has that gooey sauce. As one source notes: “This dessert was born for potlucks… just use a 9×13‑inch baking dish and add a few extra minutes.” :contentReference[oaicite:2]{index=2}
Why do we love this recipe? Because:
• It’s fast—prep in five minutes in many cases. :contentReference[oaicite:3]{index=3}
• Uses basic pantry staples (butter, sugar, cocoa, flour, milk, vanilla, boiling water).
• Delivers that wow factor—molten sauce, warm chocolate, comforting texture.
• Flexible—can be adapted dairy‑free, gluten‑free, etc. :contentReference[oaicite:4]{index=4}
Why This Recipe Works
Let’s break down the key components and what each one brings:
- Melted butter in dish: Starting with the melted butter gives the bottom layer fat (richness) and allows the batter to sit over a layer that’s already warm. Many versions begin this way. :contentReference[oaicite:5]{index=5}
- Batter of flour + sugar + cocoa + milk + vanilla: This forms the “cake” portion on top. It rises and bakes into a brownie‑like crust.
- Topping of sugar + cocoa powder: Sprinkled over the batter, ready to transform into sauce beneath as water is poured over.
- Pouring boiling water on top (without stirring): This step is the magic—by not stirring, you allow the heavier cocoa‑sugar mix and water to sink, creating a molten chocolate sauce underneath the cake layer. Explained nicely by one blogger: “You layer everything just so… don’t stir. The batter rises as it bakes and the cocoa mixture sinks, creating a rich chocolate sauce on the bottom.” :contentReference[oaicite:6]{index=6}
- Baking until top is set but bottom still gooey: The contrast in textures makes this dessert memorable—crispy/soft top and warm sauce underneath. :contentReference[oaicite:7]{index=7}
Chef Gordon Ramsay would likely emphasize: “Let your ingredients do the work—don’t over‑stir, don’t over‑bake.” Chef Ina Garten might say: “Serve it warm, with a scoop of vanilla ice cream, and you’ll look like you spent hours in the kitchen.” Many versions suggest serving with ice cream to elevate the dessert. :contentReference[oaicite:8]{index=8}
What You’ll Find In This Article
Here’s what you can expect:
- A full ingredients list with measurements.
- A detailed step‑by‑step method with notes and optional variations.
- Chef tips & health‑safety considerations.
- Nutrition & health benefits table.
- Internal links to related articles on www.freshtonerhungar.com.
- 10 Frequently Asked Questions (FAQs).
Let’s gather the ingredients and get baking!
Ingredients
Here’s a structure based on one of the classic versions. You can scale up or down as needed.
- ½ cup (113 g) butter (salted or unsalted) – melt in the baking dish. :contentReference[oaicite:9]{index=9}
- 1½ cups (≈297 g) granulated sugar – for the batter. :contentReference[oaicite:10]{index=10}
- 3 tablespoons (≈16 g) unsweetened cocoa powder – batter layer. :contentReference[oaicite:11]{index=11}
- 2 cups self‑rising flour (or make your own from all‑purpose flour + baking powder) – structure. :contentReference[oaicite:12]{index=12}
- 1 cup (≈240 mL) milk (whole or sub with oat/almond for variation) – liquid for batter. :contentReference[oaicite:13]{index=13}
- 2 teaspoons vanilla extract – flavour boost. :contentReference[oaicite:14]{index=14}
- Topping layer: 2 cups (≈396 g) granulated sugar **and** ½ cup (≈42 g) unsweetened cocoa powder. Sprinkle over top. :contentReference[oaicite:15]{index=15}
- 3 cups (≈681 g) boiling water – pour over topping. :contentReference[oaicite:16]{index=16}
Note: The exact measurements may vary slightly depending on the version you follow. For example, one version uses milk + buttermilk and different sugar proportions. :contentReference[oaicite:17]{index=17}
Step‑by‑Step Method
- Pre‑heat and melt butter: Pre‑heat oven to 350 °F (≈175 °C). Place the butter in a 9×13‑inch (or appropriate) baking dish and put it in the oven until melted. :contentReference[oaicite:18]{index=18}
- Prepare the batter: In a mixing bowl, whisk together sugar, cocoa powder, flour (or self‑rising flour), milk, and vanilla extract until smooth. Some versions include baking powder and salt if using AP flour. :contentReference[oaicite:19]{index=19} Then pour this batter over the melted butter in your baking dish. Do **not** stir. :contentReference[oaicite:20]{index=20}
- Prepare the topping: In a separate bowl, mix together the topping sugar and cocoa powder. Evenly sprinkle this mixture on top of the batter layer. :contentReference[oaicite:21]{index=21}
- Add the hot water carefully: Slowly pour the boiling water evenly over the sugar‑cocoa mixture. Again, do **not** stir. This allows the molten sauce to form underneath while the cake bakes above. :contentReference[oaicite:22]{index=22}
- Bake: Place the dish in the oven and bake for 35–40 minutes (or until the top is set but still has a slight jiggle). The center should bounce back lightly when pressed. :contentReference[oaicite:23]{index=23}
- Cool slightly: Remove from oven and allow to cool for 10‑15 minutes. This rest period allows the molten layer to thicken slightly. Many sources recommend 15 minutes. :contentReference[oaicite:24]{index=24}
- Serve: Serve warm, ideally with a generous scoop of vanilla ice cream or whipped cream. The contrast between warm chocolate sauce and cold ice cream is irresistible. :contentReference[oaicite:25]{index=25}
- Leftovers & storage: Cover cooled dish and refrigerate up to 3–5 days. To reheat, warm gently in the oven or microwave until warm. Sauce will firm slightly but remain gooey. :contentReference[oaicite:26]{index=26}
Tips & Variations
- Use good cocoa: Unsweetened cocoa powder gives the best chocolate depth—don’t skimp.
- Don’t stir after pouring water: The distinct layers form because you don’t stir. One blog states: “You layer everything just so — don’t stir… the cocoa mixture sinks, creating a rich chocolate sauce on the bottom.” :contentReference[oaicite:27]{index=27}
- Serve promptly: While you can store and reheat, this dessert is best enjoyed warm when the sauce is still flowing.
- Make ahead/freeze: You can prep dry mix ahead of time or refrigerate after baking and reheat slices. Some sources say you can freeze up to 3 months. :contentReference[oaicite:28]{index=28}
- Dietary adaptations:
• Use dairy‑free milk (almond/oat) and vegan butter for a dairy‑free version.
• Use gluten‑free flour blend instead of self‑rising for gluten‑free. Many versions mention GF adaptation. :contentReference[oaicite:29]{index=29} - Add flavour twists: A teaspoon of instant espresso powder boosts chocolate richness. Or sprinkle chopped toasted pecans on top for crunch. :contentReference[oaicite:30]{index=30}
Chef Tips & Safety Considerations
Here are some extra notes from the “Chef Bobby Flay seat” and important safety reminders:
- Quality ingredients matter: Using real butter (not margarine), good cocoa, fresh vanilla extract—these elevate flavour.
- Hot water pour caution: When pouring boiling water over the dish, do it carefully and slowly to avoid spills or steam burns.
- Oven and timing: Make sure your oven is at correct temperature and that you don’t over‑bake; over‑baking eliminates that gooey sauce. One source says: “Don’t over‑bake. When the dish is done, the top will be fluffy and the bottom still soft.” :contentReference[oaicite:31]{index=31}
- Serving temperature: The molten sauce is extremely hot right after baking. Let it rest and warn others to take care when scooping and serving.
- Storage safety: Because this dessert contains dairy and sugar, be sure to refrigerate leftovers promptly (within 2 hours). Reheat appropriately.
- Balance indulgence: This is a rich dessert—serve with fresh fruit or a crisp salad for contrast, or smaller portions if you’re mindful of calories.
Nutrition & Health Benefits Table
Here’s an approximate nutrition table per serving (based on ~9 serving version). Values will vary depending on exact ingredients and portion size. :contentReference[oaicite:32]{index=32}
| Component | Estimated Per Serving |
|---|---|
| Calories | ≈ 350‑400 kcal |
| Total Fat | ≈ 15‑20 g |
| Saturated Fat | ≈ 8‑10 g |
| Carbohydrates | ≈ 50‑65 g |
| Sugars | ≈ 35‑45 g |
| Protein | ≈ 4‑6 g |
| Sodium | Varies – likely ~200‑300 mg |
| Key Nutrients / Benefits |
• Cocoa powder provides flavanols and deep chocolate flavour. • Milk and butter supply calcium and fat (for richness and satiety). • The simple method means fewer additives and cleaner ingredient list than many pre‑packaged desserts. |
Health tip: Though this dessert is rich in sugar and fat, you can enjoy it as part of a balanced meal by serving it alongside fruit or a light salad. Also, consider portion control. And if you tweak with lower‑fat milk or less sugar, you can lighten it further. Always enjoy in moderation.
Internal Links for Further Reading
- Love cobblers? Check out our Cobblers & Desserts Collection.
- Want more chocolate dessert inspiration? See our Chocolate Desserts Round‑Up.
- Interested in one‑pan desserts with minimal clean‑up? Visit our One‑Pan Desserts Guide.
10 Frequently Asked Questions (FAQs)
- What makes this different from a regular chocolate cake?
The key difference is the layering and the molten sauce created under the cake layer—when you pour boiling water over the topping and don’t stir, you wind up with a gooey sauce beneath a baked cake layer. Many sources say it’s “like a lava cake but easier.” :contentReference[oaicite:33]{index=33} - Can I use regular flour instead of self‑rising?
Yes. If the recipe calls for self‑rising flour and you only have all‑purpose flour, use it and add about 1½ tsp baking powder (and a pinch of salt) per cup of flour. Some versions already include baking powder. :contentReference[oaicite:34]{index=34} - Can I make this gluten‑free?
Absolutely. Many bloggers mention using a 1:1 gluten‑free flour blend in place of flour with good results. :contentReference[oaicite:35]{index=35} - Can I make it dairy‑free?
Yes. Use plant‑based milk (such as almond or oat) and vegan butter or coconut oil in place of butter. Many reviewers successful adapt for dietary needs. :contentReference[oaicite:36]{index=36} - Do I have to pour boiling water? Won’t that mess up the batter?
It might feel counterintuitive, but pouring the boiling water carefully over the sugar‑cocoa topping, without stirring, is what creates the molten sauce beneath. One source explains the science: the topping mixture sinks and forms sauce. :contentReference[oaicite:37]{index=37} - How do I know when it’s done?
The top should be set and have a slight bounce when pressed, but the center will still be slightly loose underneath. Overbaking will eliminate the gooey sauce. Many recipes recommend 35‑40 minutes for a 9×13‑inch dish. :contentReference[oaicite:38]{index=38} - Can I prepare ahead of time?
You can mix the dry ingredients ahead, or even assemble the batter and topping before pouring the water, but it’s best baked and served warm. Some versions suggest you can refrigerate leftovers and reheat. :contentReference[oaicite:39]{index=39} - Can I add mix‑ins like nuts or fruit?
Yes. Some variations suggest sprinkling chopped toasted pecans for crunch or adding cherries for a chocolate‑cherry twist. Keep in mind add‑ins may affect bake time. :contentReference[oaicite:40]{index=40} - How should I store leftovers?
Cover cooled dish and refrigerate up to 3‑5 days. The sauce will firm somewhat. Reheat portions gently in the microwave (20‑30 seconds) or oven until warm. :contentReference[oaicite:41]{index=41} - What should I serve with it?
This dessert pairs beautifully with a scoop of vanilla ice cream (melting into the warm chocolate sauce) or whipped cream. The contrast of warm and cold enhances the experience. Some recommend salted caramel ice cream for a twist. :contentReference[oaicite:42]{index=42}
Final Thoughts
And there you have it—a full, detailed guide to making a decadent Southern Chocolate Cobbler at home. With molten chocolate sauce, a brownie‑like cake top, simple ingredients and a straightforward technique—you’ll create something memorable. Whether you’re serving it for a gathering, a celebration or simply as a treat after dinner, this recipe delivers comfort and wow‑factor in one pan.
Remember: melt the butter, layer the batter, sprinkle the topping, pour the boiling water (don’t stir!), bake until just set, and serve warm with a scoop of ice cream. Your guests (and taste buds) will thank you. 🍨
— Your cooking guide, Chef Cooking