
✨ How to Remove Grease and Odors from Kitchen Cabinets — Using Pantry Oils
Greasy kitchen cabinets are a universal nuisance. They feel sticky, trap odors, and dull the beauty of your kitchen. But what if you could cut through grime and refresh your cabinets — all without harsh chemicals, scrubbing, or damage to your cabinet finish?
The answer is surprisingly simple: use a small amount of household oil. This method not only dissolves stubborn grease but also neutralizes trapped odors, leaving your kitchen smelling clean and your cabinets looking polished.
🧼 Why Oil Works for Grease Removal
Oil attracts oil. This basic principle of chemistry is what makes this method so effective. When you apply a clean oil to greasy cabinet surfaces, it softens and dissolves the sticky residue, allowing you to wipe it away gently — no scrubbing required.
Plus, many oils have natural deodorizing properties that help lift cooking odors that cling to wood, laminate, or painted surfaces.
🔍 Best Oils to Use for Kitchen Cabinet Cleaning
According to James Holloway, a professional home maintenance instructor, these are the top oils for kitchen use:
- Vegetable oil (canola or sunflower): Inexpensive and highly effective for cutting grease.
- Mineral oil: Odorless, shelf-stable, and commonly used for food-safe wood care.
- Coconut oil (liquid form): Offers a light, fresh scent and cleans gently.
Avoid olive oil — while common in kitchens, it can leave a strong scent and turn sticky over time.
🛠️ Tools You’ll Need
- Soft microfiber cloth (2 total)
- Your choice of cleaning oil (see above)
- Optional: essential oil (1–2 drops) for added fragrance
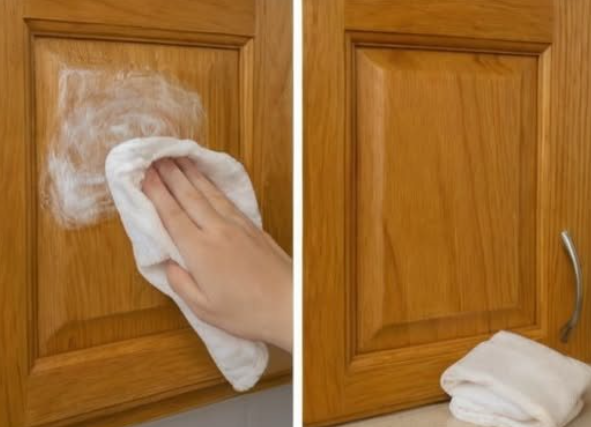
🧽 Step-by-Step: How to Clean Greasy Cabinets with Oil
Step 1: Apply a Small Amount of Oil
Place just a few drops of oil on a soft microfiber cloth. You don’t want it dripping — the cloth should feel slightly damp, not oily.
Step 2: Wipe Gently
Working in small sections, wipe the cabinet surface in the direction of the wood grain (for wood cabinets) or in smooth, circular motions for painted or laminate cabinets.
Step 3: Watch the Grease Lift
As you wipe, the oil will dissolve built-up grime and cooking residue. You’ll feel the surface become cleaner within seconds — no elbow grease required.
Step 4: Buff with a Clean Cloth
Use a second, dry microfiber cloth to buff away any oil residue. This leaves your cabinets smooth, polished, and completely grease-free.
No rinsing required! In fact, leaving a trace amount of oil behind can help prevent future grease buildup and repel dust.
📊 Quick Comparison: Pantry Oil Cleaning vs Commercial Degreasers
| Feature | Pantry Oils | Commercial Degreasers |
|---|---|---|
| Effectiveness | ✅ Excellent on grease | ✅ Strong grease-cutting power |
| Fumes | 🌿 Odor-free or pleasant | ⚠️ Can be strong or chemical-smelling |
| Cabinet Safety | ✅ Gentle on all finishes | ⚠️ May strip wood or dull paint |
| Cost | 💲Very affordable (you likely already have it) | 💰 More expensive per use |
| Eco-friendliness | ✅ Biodegradable | ❌ Not always environmentally safe |
🧃 Related Pantry Hacks
- Use lemon juice and baking soda to deodorize sink drains.
- Try vinegar and water (50/50) for glass and chrome polishing.
- Clean stovetop grime with baking soda paste and a damp cloth.
⚠️ Common Mistakes to Avoid
- Using too much oil: Can leave cabinets feeling slick or gummy.
- Skipping the second cloth: Always buff afterward to remove any residue.
- Using strong-scented oils: Olive oil and sesame oil aren’t ideal — they can turn rancid or leave strong odors.
- Scrubbing too hard: This method is designed to be gentle. Let the oil do the work.
💬 Top 10 FAQs About Oil Cleaning for Cabinets
1. Will this work on painted cabinets?
Yes, but always test a small spot first. It’s safe for most paint types when applied gently and wiped clean.
2. Does this method remove odors?
Yes! Grease traps smells. Once the grease is lifted, lingering odors disappear too.
3. What if my cabinets are sticky?
This is exactly the solution you need. The oil softens sticky buildup so it can be wiped away cleanly.
4. Can I use essential oils for scent?
Yes. Add 1–2 drops of lemon or lavender oil to your cleaning cloth for a natural fragrance boost.
5. Is this safe for antique or varnished wood?
Yes, especially if you use mineral oil. It’s gentle and helps condition the wood without damaging finishes.
6. How often should I clean with this method?
Every 2–4 weeks works well for high-traffic kitchens. Use more frequently if you cook with a lot of oil or butter.
7. Will this leave residue?
Only if too much oil is used. Always buff clean with a dry cloth.
8. What cloths work best?
Microfiber cloths are ideal. They’re soft, reusable, and won’t scratch surfaces.
9. Does it matter which direction I wipe?
For wood grain, follow the grain direction. For other surfaces, smooth circular motions work best.
10. Can this method be used on drawer pulls or handles?
Yes, especially metal ones that attract grease. Use a small amount of oil and wipe clean afterward.
🌿 Final Thoughts: Clean Cabinets, Naturally
Using pantry oil to clean kitchen cabinets might sound counterintuitive — but it’s one of the most effective, affordable, and gentle methods out there. With just a couple of cloths and a few drops of oil, you can restore your cabinets to a clean, odor-free state without the fuss of heavy cleaners or dangerous fumes.
Whether you’re deep-cleaning your kitchen or just want to maintain a fresher cooking space, this trick deserves a permanent spot in your cleaning toolkit. For more kitchen care ideas, check out pantry-powered tips at Fresh Toner Hungar.