
Hook: A Simple No‑Bake Treat That Satisfies Every Craving
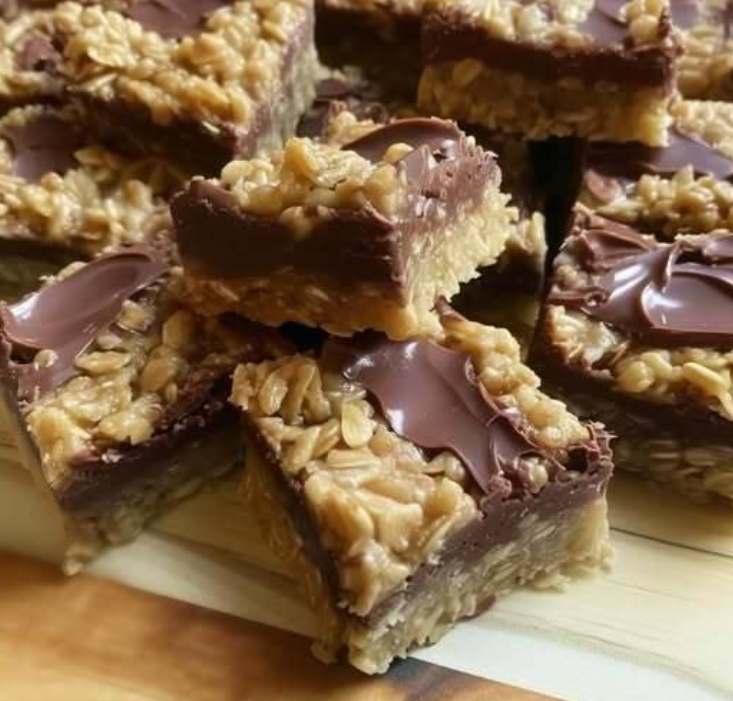
When you want dessert without turning on the oven or wrestling with dough, these No‑Bake Chocolate Oat Bars come to the rescue. With a buttery brown‑sugar oat base, a molten peanut‑butter and chocolate middle, and a set, cool finish—every bite is rich, textured and delightfully indulgent. Whether you’re prepping ahead for a gathering or simply craving something satisfying, this treat delivers.
Introduction: Why These Bars Work and Why You Should Make Them
Often, we associate great desserts with lengthy processes, ovens, and lots of time. But these bars flip that idea: they rely on simple ingredients, no actual baking (beyond melting), minimal equipment and major flavour payoff. The combination of quick‑cooking oats (for crunch and chew), brown sugar + butter (for richness), peanut butter + chocolate (for decadence) works beautifully together.
In the article that follows you’ll find: complete ingredients and prep notes, detailed step‑by‑step instructions, chef‑level tips & variations, health & safety considerations, a nutrition & health‑benefits table, 10 FAQs to cover all the corners, and internal link suggestions to help boost your blog’s SEO. Let’s dive in.
Ingredients & Prep Notes
Here are the ingredients you provided, along with optional tweaks and helpful notes:
- Butter — 1 cup
- Packed brown sugar — ½ cup
- Vanilla extract — 1 teaspoon
- Quick‑cooking oats — 3 cups
- Semisweet chocolate chips — 1 cup
- Peanut butter — ½ cup
Optional enhancements or swaps:
- Use natural or crunchy peanut butter for texture variation (just adjust if oil separates).
- Substitute a portion of the chocolate chips with dark chocolate chunks (70% cocoa) for a deeper flavour.
- Mix in ½ cup chopped nuts (pecans, walnuts) or ¼ cup shredded coconut into the oat base for extra texture.
- For a more “tart” contrast, you could drizzle a little dark‑chocolate ganache on top after setting, or sprinkle sea salt flakes to elevate flavour.
Prep tips:
- Line or grease a 9×9‑inch square pan as directed so your bars release cleanly.
- Use a heavy saucepan for melting—maintain low‑moderate heat to prevent burning the butter or chocolate mixture.
- Have your chocolate chips and peanut butter ready so you can move smoothly from the oat base into the chocolate layer.
Step‑by‑Step Instructions
- Prep Pan & Melt Butter: Grease or line a 9×9‑inch square pan. In a large saucepan set over medium heat, melt the 1 cup butter.
- Make Oat Mixture: To the melted butter add the ½ cup packed brown sugar and 1 teaspoon vanilla extract. Stir until sugar dissolves. Then mix in the 3 cups quick‑cooking oats. Cook over low heat for ~2–3 minutes, stirring until the mixture is well combined and uniform.
- Form Crust & Reserve Topping: Press half of the oat‑butter mixture firmly into the bottom of the prepared pan to form the crust layer. Reserve the remaining half of the mixture for the topping layer later.
- Make Chocolate‑Peanut Butter Filling: In a small heavy saucepan, melt the 1 cup semisweet chocolate chips and ½ cup peanut butter over low heat, stirring frequently until smooth and fully combined.
- Layer & Chill: Pour the chocolate‑peanut butter mixture evenly over the crust layer in the pan. Using a spatula or back of a spoon, smooth it out. Then crumble the reserved oat mixture over the chocolate layer, pressing in gently (but not firmly) so it sticks evenly. Cover the pan and refrigerate for 2–3 hours (or overnight) until fully set.
- Cut & Serve: Remove from fridge and allow it to come to room temperature for a few minutes (this helps cutting). Then cut into squares and serve. Enjoy the buttery base, chocolate‑peanut butter middle and oat‑crisp topping in every bite.
Chef‑Level Tips & Variations
Here are some expert tips and fun variations to tailor the bars to your taste or occasion:
- Quality of chocolate matters: Use good‑quality semisweet chocolate chips (or chopped baking chocolate) for smoother melt and better flavour—cheap chips may not melt as smoothly or deliver as rich a taste.
- Pressing the crust: When pressing the oat mixture into the pan for the crust, use the bottom of a flat measuring cup or glass lightly greased—this ensures an even, compact base that holds well when slicing.
- Clean cuts: Warm the knife slightly (run under hot water and dry) and then slice while cold for cleaner edges. Wiping the knife between cuts helps maintain neat squares.
- Flavor tweaks:
- Add ¼ tsp cinnamon or a pinch of sea salt to the oat mixture for warmth or contrast.
- Swap peanut butter for almond butter (or sunflower seed butter if nut‑free). Texture may vary slightly but flavour still great.
- Go half‑and‑half with white chocolate and semisweet for a sweeter top layer.
- Make‑ahead & storage: These bars store well in the fridge for up to ~5 days (in a sealed container). They also freeze well: wrap individual squares in plastic then foil, and freeze up to ~1–2 months. Thaw in fridge or at room temp before serving.
Health & Safety Considerations
Even though this is a no‑bake treat, you’ll want to keep a few mindful things in mind:
- Allergen awareness: Contains dairy (butter, chocolate chips unless dairy‑free) and nuts (peanut butter). If serving those with allergies, consider nut‑free butter or dairy‑free chocolate substitutes.
- Sugar & fat content: This is an indulgent bar—rich in sugar (brown sugar + chocolate) and fat (butter, peanut butter, chocolate). Serve in modest portions and balance with lighter foods if desired.
- Cooling before cutting: Because it sets in the fridge, make sure the bars are fully chilled before slicing—this improves texture and prevents messy cuts.
Nutrition & Health Benefits Table
Here’s an approximate nutrition breakdown per bar, assuming you cut the 9×9 pan into 16 equal squares. (Values will vary based on specific brands and modifications.)
| Nutrient | Approximate Amount per Bar | Notes / Benefit |
|---|---|---|
| Calories | ~230‑260 kcal | Rich treat—makes this a good “share” or special‑occasion snack. |
| Total Carbohydrates | ~26‑30 g | From oats, brown sugar, chocolate. |
| Protein | ~4‑5 g | From oats and peanut butter; modest protein boost. |
| Total Fat | ~12‑15 g | From butter, peanut butter, chocolate chips. |
| Saturated Fat | ~6‑7 g | From butter and chocolate—consider as a rich treat budget in your day. |
| Sodium | ~50‑70 mg | Relatively low sodium unless you use salted butter or salted peanut butter. |
Health takeaway: These bars are a decadent treat best enjoyed in moderation. To make them lighter, consider using part‑skim peanut butter, reducing the brown sugar slightly, or adding chopped fruit or extra oats to increase fibre and volume.
Frequently Asked Questions (10 FAQs)
- 1. Can I use old‑fashioned oats instead of quick‑cooking oats?
- Yes—but the texture will be slightly chewier and might require pressing more firmly. Quick‑cooking oats ensure the bars set well and hold together. If using old‑fashioned, consider slightly finer chop or mix in a little additional butter to bind.
- 2. Do I need to refrigerate these bars?
- Yes—they set best when chilled. After assembling and layering, refrigerate for 2–3 hours (or preferably overnight) before slicing. This ensures the chocolate layer is firm and the bars hold shape.
- Can I make them gluten‑free?
- Yes—just ensure the oats are certified gluten‑free (cross‑contact safe) and all other ingredients are gluten‑free. The rest of the recipe works the same.
- How long will they keep?
- If stored in an airtight container in the fridge, they should keep for ~4–5 days. You can also freeze individual bars (wrapped) up to ~1–2 months—thaw in fridge before serving.
- Can I omit the peanut butter?
- You can—but you’ll lose some flavour and texture that peanut butter adds. If omitting, consider increasing chocolate chips to 1¼ cups or adding an extra ¼ cup oats or chopped nuts to maintain balance.
- What if my chocolate‑peanut butter mixture is too thick to spread?
- If it’s very thick, gently warm on low heat for an extra minute and stir until smoother. You can also add a teaspoon of milk or cream to loosen it slightly—being careful not to make it too liquid.
- Can I cut the bars while still warm?
- It’s possible, but they’ll likely be messy and may lose shape because the layers haven’t fully set. Cooling gives cleaner, neater squares.
- How thick will each bar be?
- Given a 9×9 pan and ~16 servings, each bar will be ~¾‑inch thick (depending on pressing). If you prefer smaller portions, you could cut 20 bars instead—just adjust your expectations accordingly.
- Can I add mix‑ins like nuts, dried fruit or candy?
- Yes—just mix them into either the oat base (e.g., chopped nuts or dried fruit) or sprinkle them on top of the chocolate before adding the oat topping. Just don’t overload, as too many additions can make the layers less stable.
- Should I use salted or unsalted butter?
- Unsalted butter gives you more control over saltiness. If you use salted, just be mindful and taste other ingredients (e.g., peanut butter, chocolate) to avoid overly salty bars.
Internal Links for Your Blog & SEO
To enhance your site’s internal linking and user engagement, consider adding the following anchors:
- No‑Bake Desserts for Quick, Stress‑Free Baking
- Oat‑Based Sweet Treats: From Bars to Cookies
- Peanut Butter & Chocolate Pairings You’ll Love
Final Thoughts: Make, Slice & Enjoy the Crunchy‑Creamy Delight
Whether you’re serving these bars at a potluck, packing them for lunch, or simply treating yourself, these No‑Bake Chocolate Oat Bars deliver big flavour with less fuss. The buttery oat crust, luscious chocolate‑peanut butter layer and crisp oat topping combine into one irresistible bite. Make them once and you’ll find them becoming a go‑to comfort dessert.
So gather your ingredients, line your pan, melt, mix, press, chill—and slice into squares worthy of sharing (or not!). Happy baking (or no‑baking!) and enjoy every delicious bite. 🍫🎉