
City Chicken – Don’t LOSE this Recipe 😋
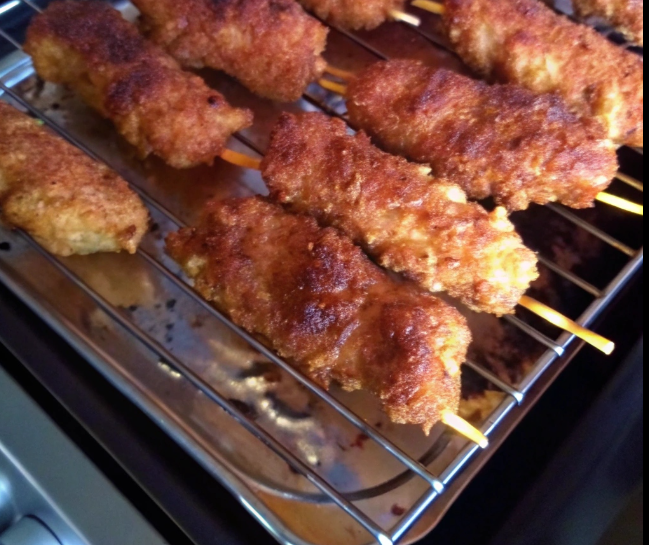
What if I told you there’s a recipe called “City Chicken” that contains *no chicken at all* —but delivers the comforting, golden‑crust satisfaction of fried drumsticks or bites on a stick? It’s true. This vintage Midwestern dish features cubes of pork (or veal), placed on wooden skewers, breaded or dredged, then fried and/or baked until crisp and juicy. The name may confuse at first, but once you taste it you’ll understand why it’s a cherished comfort food in regions like Pittsburgh, Cleveland and upstate New York. :contentReference[oaicite:1]{index=1}
In this article you’ll get everything: the ingredient list (based on your core four items plus enhancements), step‑by‑step instructions, history and regional context, chef‑style tips, health and food‑safety considerations, a detailed nutrition & health‑benefits table, and a deep round‑up of FAQs. Whether you’re cooking it for a family dinner, prepping for a crowd, or simply giving a classic recipe a try—this is your full guide.
Why This Dish Works (and Why You’ll Love It)
- Comfort food with a twist: It’s breaded, golden, and satisfying—just like fried chicken, but uses pork/veal to achieve the texture and be cost‑effective historically. :contentReference[oaicite:2]{index=2}
- Great for skewers/portions: Cubes on sticks make it fun, easy to serve, and perfect for sharing or presentation.
- Flexible cooking method: You can fry then bake (traditional), or adapt for air‑fryer or oven only. :contentReference[oaicite:3]{index=3}
- Regional nostalgia: This dish has history—its roots in immigrant communities and Depression‑era frugality give it story and character. :contentReference[oaicite:4]{index=4}
- Customizable filling & crust: From pork to veal, breadcrumbs to flour only, baking or frying—you can tweak to your preferences or dietary needs.
Ingredients You’ll Need
Here’s a robust ingredient list based on your core items and expanded to build a full loaf or skewered meal. This is approximate for ~6 servings (adjust up or down as needed).
- 1½ lbs (~680 g) pork (or veal), cut into ~1½‑inch cubes
- 8 wooden skewers
- 1 cup all‑purpose flour
- 2 large eggs
- 2 Tbsp milk or water (for egg wash)
- 1½ cups seasoned breadcrumbs (or plain breadcrumbs + 1 tsp paprika + ½ tsp garlic powder + salt & pepper) – optional but adds texture
- Salt & freshly ground black pepper, to taste
- Vegetable or canola oil (for frying) – enough to shallow fry or deep fry the skewers
- Optional bake finish: a baking dish + oven preheated to ~350 °F (175 °C)
- Optional serving: brown gravy or your favourite dipping sauce (e.g., mustard, barbecue, or honey mustard)
Step‑by‑Step Instructions
- Prep the meat & skewers: Cut the pork (or veal) into uniform cubes (about 1½″) so they cook evenly. Thread 3‑4 cubes onto each wooden skewer, leaving enough skewer at each end for handling. :contentReference[oaicite:5]{index=5}
- Set up your dredge stations: In one shallow dish: the flour, seasoned with salt & pepper (and optional paprika/garlic powder). In a second bowl: beat together the 2 eggs + 2 Tbsp milk (or water). In a third bowl: the seasoned breadcrumbs (if using). Some simpler versions skip the breadcrumbs and only use flour + egg. :contentReference[oaicite:6]{index=6}
- Coat the skewers: For each skewer: first dredge in flour, shaking off excess; then dip into the egg wash; then roll or press into breadcrumbs (if using). Ensure a uniform coating. Place the coated skewers on a plate and let them rest briefly (a few minutes) so the coating adheres. :contentReference[oaicite:7]{index=7}
- Brown the skewers: In a large skillet or Dutch oven, heat enough oil for shallow frying (or deep if you prefer). Over medium‑high heat, fry the skewers in batches, turning to brown all sides—about 2‑4 minutes per side until golden. Avoid crowding the pan. :contentReference[oaicite:8]{index=8}
- Bake to finish: Transfer the browned skewers to a baking dish (or skillet with oven‑proof handle). Pre‑heat your oven to ~350 °F (175 °C). Bake covered (foil or lid) for ~20‑30 minutes (or longer depending on thickness) until the internal temperature of the meat reaches at least ~145 °F (63 °C), per pork safe cooking guidelines. Remove cover and bake additional ~10 minutes for crisping, if desired. :contentReference[oaicite:9]{index=9}
- Serve hot: After baking, let the skewers rest for ~5 minutes. Serve with mashed potatoes, green beans, or a simple salad. Consider offering a brown gravy or dipping sauce for extra comfort. :contentReference[oaicite:10]{index=10}
Nutrition & Health Benefits Table
| Component | Approximate Amount | Benefit / Notes |
|---|---|---|
| Pork (or veal) cubes – 1½ lbs | ≈ 680 g | High in protein, provides iron, B‑vitamins; choose lean cuts to reduce saturated fat. |
| Flour (1 cup) | ≈ 120 g | Carbohydrate base for dredging; little nutritional value beyond calories. |
| Eggs (2 large) | ≈ 100 g | Protein, vitamin D, choline; helps bind coating. |
| Breadcrumbs (optional, 1½ cups) | ≈ 150 g | Adds texture but also adds extra carbs/calories; consider whole‑grain breadcrumbs for more fibre. |
| Oil for frying | Variable | Provides crisping but adds fat; use moderate amount and drain excess. |
Health tips:
- Choose lean pork loin or tenderloin instead of fattier cuts.
- Drain the skewers on paper towels after frying to remove excess oil.
- Bake rather than deep‑fry where possible to reduce total oil absorption.
- Add vegetables or a side salad to balance the meal and increase fibre, vitamins & minerals.
- Be mindful of added sauces/gravy—they can increase sodium and calories significantly.
History & Origins of City Chicken
Despite its name, “City Chicken” is not made of chicken at all. Instead, it emerged in the early 1900s and during the Great Depression as a way for working‑class families, especially in industrial Midwestern cities (Cleveland, Pittsburgh, Detroit) to enjoy a festive “meaty” dish without using actual chicken, which at the time was relatively expensive. :contentReference[oaicite:11]{index=11}
Originally, pork or veal cubes (or a combination) were skewered and breaded to replicate the appearance and experience of chicken drumsticks. The dish gained popularity in Polish and Ukrainian immigrant communities, hence its roots in those ethnic enclaves around the Rust Belt. :contentReference[oaicite:12]{index=12}
Over time, the dish became a nostalgic comfort meal, especially in the areas where it originated. The skewers are often sold ready‑prepared in meat counters in those regions. :contentReference[oaicite:13]{index=13}
Chef Tips & Tricks
From Chef Gordon Ramsay: “Make sure the meat cubes are uniform in size—this ensures even cooking and avoids a mix of under‑done and over‑done pieces.”
From Chef Ina Garten: “Let the skewers rest briefly after baking—it helps the juices redistribute, resulting in moister meat and easier slicing/serving.”
- Soak wooden skewers in water for 20‑30 minutes before using to help prevent burning during cooking or baking. :contentReference[oaicite:14]{index=14}
- Leave a small space between meat cubes on the skewer so heat circulates and coating crisps properly—but don’t leave too much or pieces will cook faster and unevenly. :contentReference[oaicite:15]{index=15}
- Use a meat thermometer to confirm internal temp (for pork/veal ~145 °F) to ensure safe cooking but maintain juiciness. :contentReference[oaicite:16]{index=16}
- If you prefer less oil absorption, fry only until golden, then finish in oven rather than deep‑frying fully. Many modern versions do this. :contentReference[oaicite:17]{index=17}
Food‑Safety & Storage Notes
- Ensure fresh pork or veal is kept refrigerated until just before prepping. Keep surfaces clean and raw meat separated from other ingredients.
- After frying and baking, store leftovers in an airtight container in the refrigerator. Consume within 3‑4 days.
- When reheating, use an oven or toaster oven (400 °F for ~10 minutes) to re‑crisp; microwave will soften the coating. Ensure internal temperature reaches ~165 °F (74 °C) for reheated leftovers.
- If preparing skewers ahead, you can coat them and hold in fridge for up to a few hours before frying/baking—but do not pre‑fry and hold at room temperature for long periods.
Variations & Customizations
- Veal + pork mix: For a more authentic version, use half pork, half veal cubes. Many older recipes used veal because it was cheaper than chicken at the time. :contentReference[oaicite:18]{index=18}
- Country‑style flour coating only: Skip breadcrumbs—just dredge in seasoned flour and egg. Simpler and quicker. :contentReference[oaicite:19]{index=19}
- Air‑fryer version: After coating, cook in air fryer at ~375 °F (190 °C) for ~12‑15 minutes until golden and cooked through. Great for lighter version. :contentReference[oaicite:20]{index=20}
- Spicy crust: Add cayenne pepper or chilli flakes to flour or breadcrumbs for a kick.
- Gluten‑free adaptation: Use gluten‑free flour + gluten‑free breadcrumbs; check all seasoning for gluten. Also adjust frying/baking times to ensure crisping.
Frequently Asked Questions (10 Detailed FAQs)
- Why is it called “City Chicken” if there’s no chicken? The name comes from the dish’s origins: in industrial cities during the Depression era, chicken was more expensive. Cooks used cheaper pork or veal, skewered and breaded to mimic drumsticks, calling it “city chicken”. :contentReference[oaicite:21]{index=21}
- What meat should I use? Pork is most common today (e.g., pork loin or tenderloin cubes). Some vintage versions include veal or a pork‑veal mix. Choose lean cuts for best texture. :contentReference[oaicite:22]{index=22}
- Do I have to fry first and then bake? Traditional versions do fry then bake to reach full cooking and crisp the coating. You can adapt to oven only or air fryer if you prefer less oil and quicker method. :contentReference[oaicite:23]{index=23}
- How do I ensure the coating stays crisp? Make sure meat is dry before dredging, press the coating on firmly, don’t overcrowd the pan or skewers, and finish baking uncovered so the crust crisps. Use higher oven temp if needed. :contentReference[oaicite:24]{index=24}
- What should I serve it with? Classic sides include mashed potatoes, green beans, a salad, or gravy poured over the skewers. Regional versions often pair with brown gravy. :contentReference[oaicite:25]{index=25}
- Can I make this ahead of time? Yes—you can skewer and coat the meat ahead (up to a few hours), refrigerate, then fry/bake when ready. Once cooked, store leftovers accordingly. Just avoid pre‑frying and leaving at room temp. :contentReference[oaicite:26]{index=26}
- How long will leftovers keep? Refrigerated in an airtight container, 3‑4 days. For best texture, re‑crisp in oven or toaster oven rather than microwave. :contentReference[oaicite:27]{index=27}
- Can I make it gluten‑free or lower carb? Yes—use gluten‑free flour and breadcrumbs. For lower carb, skip breadcrumbs and just use seasoned flour or almond meal alternative, and bake instead of frying heavily. :contentReference[oaicite:28]{index=28}
- Is it safe to use wooden skewers? Yes—soak them in water ~20‑30 minutes before skewering to reduce burning. Also leave enough skewer exposed at ends to handle. :contentReference[oaicite:29]{index=29}
- Why did this recipe originate? Because in certain U.S. cities (especially in the Great Lakes region) chicken was comparatively pricey, so home cooks used more affordable pork/veal, skewered and breaded it to resemble chicken. The dish became tradition in immigrant communities and remains a nostalgic favorite. :contentReference[oaicite:30]{index=30}
Internal Links for Further Reading
- More classic comfort food recipes at Fresh Toner Hungar
- Skewer‑based dishes and vintage recipes on Fresh Toner Hungar
- Budget‑friendly meat mains & nostalgic family dinners at Fresh Toner Hungar
Final Thoughts – Roll, Skewer & Enjoy!
This City Chicken recipe is the kind of dish that delivers flavor and nostalgia in one. With its golden crust, juicy meat, and fun presentation, it’s perfect for a family dinner, a throw‑back meal, or simply enjoying something comforting and hearty. Whether you stick with the basic flour + egg coating or go full vintage with breadcrumbs, you’ll end up with something delicious.
Don’t lose this recipe—make it, share it, serve it and treat it like the comfort food gem it deserves to be. 🍽️