
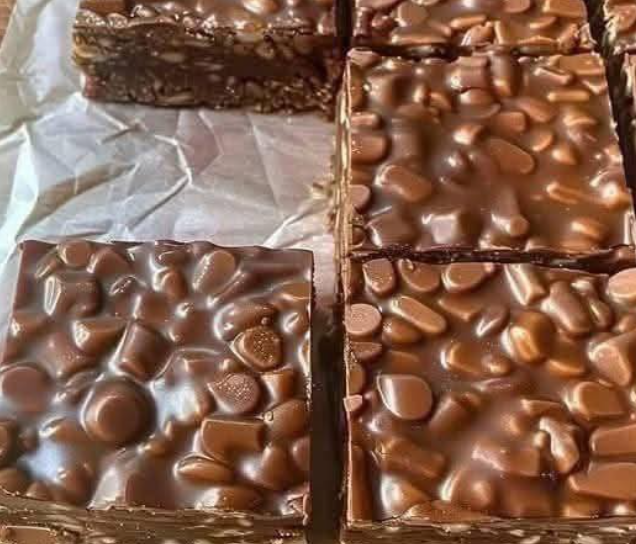
Healthy No‑Bake Chocolate Peanut Butter Crunch Bars 🍫🥜
Imagine dessert that tastes indulgent—but takes minutes to make, no baking required, and uses wholesome ingredients you feel good about. These Healthy No‑Bake Chocolate Peanut Butter Crunch Bars hit that sweet spot. They combine crunchy rice cereal, hearty oats, creamy peanut butter, a touch of honey or maple syrup, cocoa powder, vanilla, and a pinch of salt. Pressed into a pan, chilled until set, then sliced and served—they’re perfect for snack time, lunch boxes, or a treat after dinner.
Whether you’re a busy parent, a dessert lover looking for a lighter option, or someone wanting to prep snacks ahead for the week—these bars deliver. Let’s dive into why they work so well, how to make them step‑by‑step, expert tips, nutrition insights, FAQ and more.
Why You’ll Love These Bars
- No oven required: Because they’re no‑bake, you save time and avoid heating up your kitchen.
- Crunch & chew texture: The mix of crispy rice cereal and rolled oats gives you a satisfying bite and a contrast between crunchy and chewy.
- Chocolate + peanut butter magic: That classic flavour combo hits all the right spots—rich, creamy, nutty, and sweet without being overdone.
- Wholesome ingredients: With oats, cereal, peanut butter, and simply sweetened with honey or maple syrup, you get a treat that can feel compatible with a balanced lifestyle.
- Versatile for snacking and meal‑prep: Make a batch, slice, and you’ve got bars ready for quick grabs—great for after‑school, post‑workout, or an afternoon pick‑me‑up.
Ingredients: What You’ll Need
Here’s the base ingredient list for the recipe. Feel free to use this as your core and customise from there.
- 1 cup crispy rice cereal
- ½ cup rolled oats
- ½ cup peanut butter (creamy is easiest for mixing)
- ⅓ cup honey or maple syrup (your choice—maple is vegan)
- ¼ cup cocoa powder (unsweetened)
- ½ teaspoon vanilla extract
- Pinch of salt
These are the essential items; everything else is optional for tweaking flavour or texture (see variations later).
Step‑by‑Step Instructions
- Line your pan: Grab an 8×8‑inch (≈20×20 cm) square pan and line it with parchment paper, leaving some overhang for easy removal.
- Warm the wet mixture: In a small saucepan over low heat (or in a microwave‑safe bowl), combine the peanut butter, honey (or maple syrup), cocoa powder, vanilla extract, and salt. Stir gently until the mixture is smooth and well‑combined—warm enough that it flows, but not burning.
- Mix the dry ingredients: In a separate large bowl, combine the crispy rice cereal and the rolled oats. Mix gently to distribute evenly.
- Combine wet & dry: Immediately pour the warm peanut butter–cocoa mixture over the cereal/oats in the bowl. Use a spatula to stir thoroughly, making sure all the cereal and oats turn coated in the chocolate/nut butter mixture.
- Press into the pan: Transfer the mixture into the prepared 8×8 pan and use the back of a spatula or the bottom of a flat measuring cup to press it firmly and evenly into the pan. The more compact you press it the better the bars hold together when sliced.
- Chill until set: Place the pan in the fridge (or freezer for faster set) and chill for at least 1 hour, or until the mixture is fully firm and slice‑ready.
- Slice & serve: Once set, lift the bars out of the pan using the parchment overhang. Place on a cutting board and slice into your desired number of bars (e.g., 9, 12 or 16). Serve immediately or store for later.
Chef Bobby Flay’s Pro Tips
- Quality of peanut butter matters: Use a natural peanut butter with minimal added sugar and oil—this gives you control of sweetness and flavour.
- Don’t over‑cook the wet mixture: When heating the peanut butter/honey/cocoa, keep heat low. Over‑heating can change texture (making it too stiff or slightly grainy) or burn the cocoa powder. The goal is warm and smooth.
- Press firmly—and evenly: Use a piece of parchment and the flat bottom of a measuring cup to press the mixture in firmly. This ensures the bars don’t crumble when sliced and hold shape better.
- Chill long enough: One hour is the minimum. If you slice too early the bars may be too soft and fall apart. For travel or storing, you may want to chill 2 hours.
- Storage tip: Once chilled, you can store the bars in an airtight container in the fridge (they’ll be firmer) or at room temperature (they’ll be a little softer but still good) – depending on your preference.
Health & Safety Considerations
- Enjoy in moderation: While these are “healthier” than many processed snack bars, they still contain sugar (from honey/maple) and nut butter. If you’re tracking calories or macros, portion size matters.
- Check for nut allergies: Peanut butter is used here. If someone is allergic, you can substitute with almond butter, cashew butter or even sunflower seed butter.
- Use safe ingredients: If you’re preparing for children, ensure the peanut butter is smooth (not chunky) and the oats/cereal are age‑appropriate.
- Food‑safety storage: If keeping at room temperature, store in a cool, dry place; if fridge‑chilled, always use clean utensils and store covered to avoid absorbing fridge odours.
- Sugar content awareness: Although this recipe uses honey or maple versus refined sugar, the sugar content still adds up. As – dietitians warn many store‑bought bars contain high sugar amounts which can undermine health goals. :contentReference[oaicite:0]{index=0}
Nutrition & Health Benefits Table
Below is an approximate breakdown per bar (assuming you cut 12 bars from the 8×8 batch). These are estimates – actual values will vary based on your exact ingredients and portion size.
| Component | Approx Amount | Estimated Nutrients |
|---|---|---|
| Crispy rice cereal (~1 cup total for batch → ~½ cup per 6 bars) | Approx 60 g per 6 bars → ~10 g per bar | ~40‑45 kcal; Carbs ~10 g; Protein ~1 g; Fat ~0.2 g |
| Rolled oats (½ cup total → ~40 g → ~3.3 g per bar) | ~20 g per 6 bars → ~3.3 g per bar | ~12 kcal; Carbs ~2.2 g; Protein ~0.4 g; Fat ~0.2 g; Fiber ~0.3 g |
| Peanut butter (½ cup ≈ 128 g for batch → ~10.7 g per bar) | ~10.7 g per bar | ~65 kcal; Protein ~2.7 g; Fat ~5.4 g; Carbs ~2.2 g |
| Honey or maple syrup (⅓ cup ≈ 113 g batch → ~9.4 g per bar) | ~9.4 g per bar | ~30‑35 kcal; Carbs ~9.4 g; Sugars ~9.4 g |
| Cocoa powder (¼ cup ≈ 25 g batch → ~2.1 g per bar) | ~2.1 g per bar | ~6‑7 kcal; Carbs ~1.2 g; Fiber ~0.4 g; Fat ~0.2 g; some iron/magnesium |
| Vanilla extract & salt (negligible calories) | — | Minimal impact |
| Estimated total per bar | — | ~150‑160 kcal; Protein ~4 g; Carbs ~25‑26 g; Fat ~6‑7 g; Sugars ~9‑10 g |
Health Highlights:
- Contains whole grain from oats – supporting sustained energy and fibre intake.
- Peanut butter contributes plant‑based protein and healthy unsaturated fats (rather than saturated/processed fats).
- Using honey or maple syrup adds sweetness but keeps the ingredient list simple and more “whole food” oriented compared with many processed snack bars.
- Because these are homemade, you avoid many of the additives, preservatives and high levels of added sugar found in commercial energy/snack bars. :contentReference[oaicite:1]{index=1}
Frequently Asked Questions (FAQs)
- Can I use a different nut butter?
Yes. Almond butter, cashew butter or sunflower seed butter all work. Note: different nut butters may give slightly different flavour and texture (some may be firmer/slightly drier). - Can I make them gluten‑free?
Yes—use certified gluten‑free crispy rice cereal and gluten‑free rolled oats. - Can I increase the protein?
Absolutely. You could add 1–2 tablespoons of protein powder (flavoured or unflavoured) or add 1/4 cup of chopped nuts/seeds (e.g., almonds, pumpkin seeds) for extra crunch and protein. - How long will these keep?
Store in an airtight container in the fridge—best consumed within 1 week for freshness. You may also freeze individually wrapped bars for longer storage. - What if my bars are too crumbly?
Likely the mixture wasn’t pressed firmly enough into the pan or didn’t chill long enough. Next time press with firm pressure and extend the chilling time. - Can I use sugar instead of honey/maple?
You could, but the texture may change (the bars may set differently) and you lose some of the “whole‑food” aspect. If using sugar, consider a minimal amount and combine with a little liquid to help binding. - Are these suitable for kids’ lunchboxes?
Yes—they’re portable, relatively low in additives, and fun. You may want to slice smaller portions and keep in a cooler for warm climates. - Can I add extras like chocolate chips, dried fruit, nuts?
Yes! Feel free to fold in mini chocolate chips, chopped dark chocolate, dried cranberries, chopped nuts, or seeds. Just keep in mind texture and firmness: if you add liquid ingredients (like dried fruit with syrup), you may need to press harder and chill longer. - Can I make a larger batch?
Yes—doubling the recipe is simple. Use a larger pan (such as 9×13) and adjust chilling time accordingly. - How do I serve them?
You can serve straight out of the fridge, or for a slightly softer texture allow to sit at room temperature for 10‑15 minutes before eating. Pair with a cup of coffee, a glass of milk, or as a midday snack.
Variations & Customisations
Here are ideas to make the bars your own:
- Dark chocolate swirl: Melt 2 Tbsp dark chocolate and swirl it on top of the pressed bars before chilling for a marbled look and deeper flavour.
- Seed & nut boost: Add ¼ cup chopped almonds, pumpkin seeds, flax seeds or chia seeds to the dry mixture for added crunch and nutrition.
- Vegan version: Use maple syrup instead of honey and ensure peanut butter is vegan‑certified (though most natural peanut butters are).
- Lower sugar version: Reduce honey/maple syrup to ¼ cup and add 1–2 Tbsp unsweetened shredded coconut or cocoa nibs for flavour without more sugar.
- Protein bar style: Add ¼ cup protein powder and replace part of the cereal with chopped high‑protein snack (e.g., roasted chickpeas or puffed quinoa) to make these more like homemade protein bars.
- Nut‑free version: Use sunflower seed butter or soy butter instead of peanut butter; ensure cereal is nut‑free and rolled oats certified nut‑free.
Internal Reference Links
For more snack and treat ideas, you’ll enjoy these from FreshTonerHungar:
- No‑Bake Energy Bars: Quick & Healthy — A collection of easy no‑bake bar recipes.
- Peanut Butter Treats Recipe Round‑Up — Explore more of your peanut‑butter favourites.
- Healthy Snacks for Kids: Make‑Ahead & Portable — Great ideas for lunches and snacks.
Conclusion
These Healthy No‑Bake Chocolate Peanut Butter Crunch Bars deliver the best of both worlds: dessert‑like indulgence with a more wholesome ingredient list. They’re easy to pull together, require no oven, and let you customise according to your preferences. Whether you slice them for lunchboxes, take them as snacks, or simply treat yourself after a long day, they’ll become a staple in your snack rotation.
Start with the core recipe, customise with your favourite additions, and enjoy the crunch, the chocolatey‑nutty flavour, and the simplicity. Chef Ina Garten might say: “When you find something this easy and this tasty, you make it again—because it works.” So go ahead, press, chill, slice, and enjoy every bite. You deserve it. 😋